A Simple Guide For Taking An Encrypted Backup Of Your Personal Data
You may have some concerns about storing all of your data on the cloud. To ease those concerns, storing bulk of your data locally in an encrypted format, might not be a bad idea.
The following is a simple guide for taking encrypted, local backups of your data. This guide is for mac users and you don't have to be technical to follow this guide. Windows users can make use of similar process, but of course you will have to use a Windows compatible file system format, formatting & encryption utility and backup software.
After completing the steps in this guide, you will be running your own fully encrypted macOS backup solution.
Only 2 things are required for this encrypted backup solution:
1) External Hard Disk Drive (HDD)
2) Mac computer running macOS with the following default applications:
a) Disk Utility
b) Time Machine (Backup software)
OVERVIEW
To setup your own fully functional encrypted backup solution, it will take you less than 10 minutes plus the time you spend to select and buy your new HDD. Already have a capable disk? That's even better.
1: SELECT THE HARD DISK DRIVE (HDD)
The key features that you will need in the HDD for the secure and efficient backup solution are:
A) PERFORMANCE
You don't really want a high performance SSD (Solid State Drive) or a Hybrid Drive, for doing local weekly or monthly backups. A good compromise would be, a cheaper HDD, which can do backups at relatively good speeds. USB 3.0 compatibility and speed of between 5400 and 7200 RPM (Revolutions Per Minute), is a suitable compromise. For example, a 7200 RPM HDD will deliver 33% faster data rate as compared to 5400 RPM.
B) SECURITY
You don't want an unauthorized access to your backed up files. You want to be prompted for the password. For this, you will need a disk that can be encrypted.
C) COMPATIBILITY
Is the HDD compatible with your Operating System? Check the version of your OS, before buying.
D) RELIABILITY
Obviously, you would like the HDD to last at least for a few years. You don't want your data to be corrupted because of an unreliable HDD. It's always a good idea to use two HDDs, e.g. one for monthly backups and the other for weekly backups.
E) DISK SPACE
This depends on an individual needs. 1TB might be safe bet for some but not a lot of space for others, who store a lot of HD movies etc. Do this simple math, if unsure:
Let's say you have 10,000 photos from last 3 to 4 years and each photo is roughly on average 3MB in size.
1 TB = 1000 GB = 1000,000 MB
Disk space required for 10,000 photos on your computer = 10,000 x 3MB = 30,000 MB = 30GB = 0.03 TB
To keep things simple, if you are an average user, who takes photos and make short videos from his/her smartphone every now and then, has a few thousand songs, doesn't store a lot of movies, 1TB might be more than enough.
Based on my experience, I find WD My Passport Portable Storage HDD, an ideal solution.
2: CHECK IF THE HDD IS ALREADY FORMATTED
Connect the newly bought HDD to your Mac & launch Disk Utility (Click the search icon in the upper-right corner of the menu bar, or press Command-Space bar, type Disk Utility). You will see Internal and External drives listed in the left hand column. Select the HDD, under external, that you are going to format and use as a backup. Once selected, you will be able to see the HDD's file system format in the right hand column.
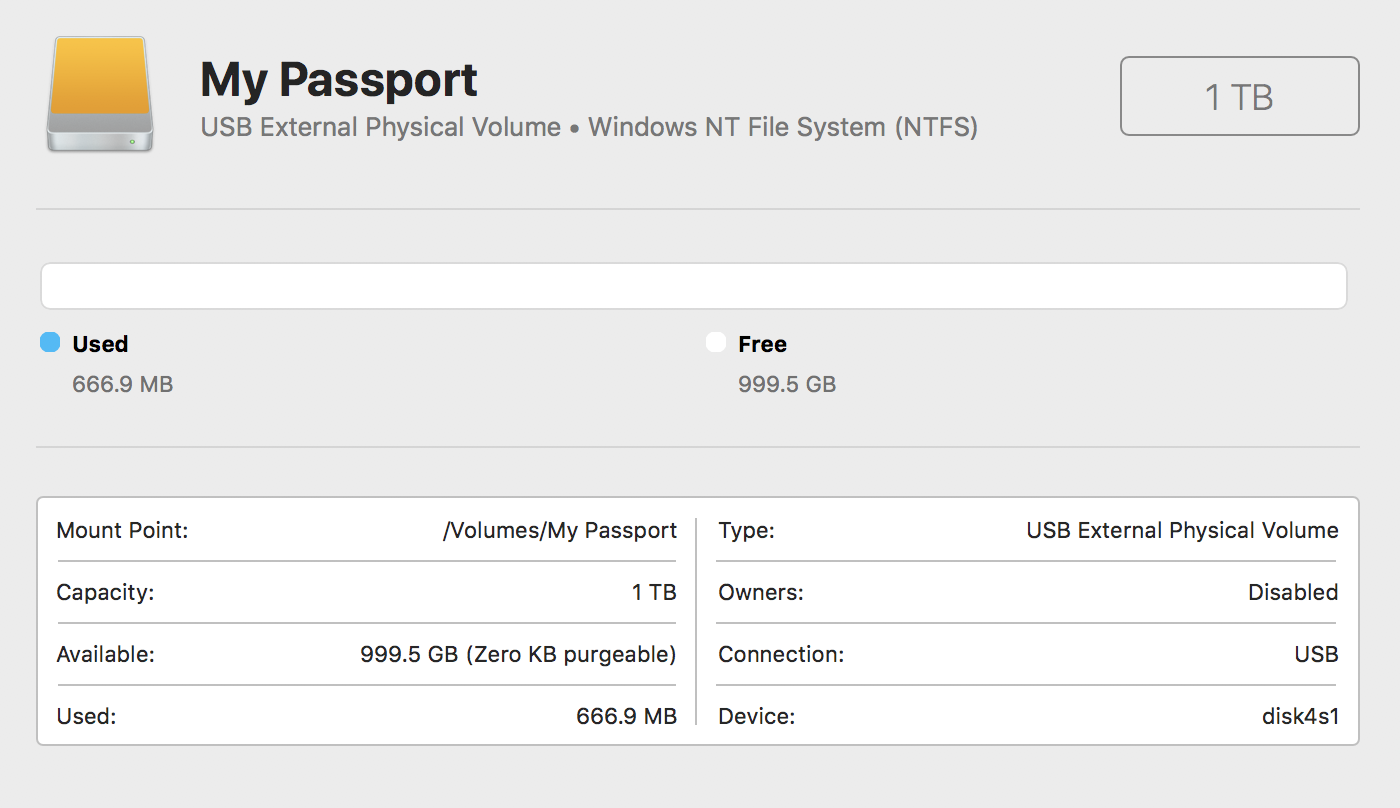
Most of the HDDs available in the market are already formatted for compatibility with Windows OS. For example, the HDD used for this guide (Original name: My Passport), came formatted with Windows NT File System (NTFS), which is not compatible with the macOS, as shown below.
3: FORMATTING AND ENCRYPTING THE HARD DISK DRIVE
Since the NTFS file system is not compatible with macOS, we will need to convert it to a file system format, which is compatible with macOS. The following file systems are available for macOS:
APFS (Apple File System)
MAC OS Extended
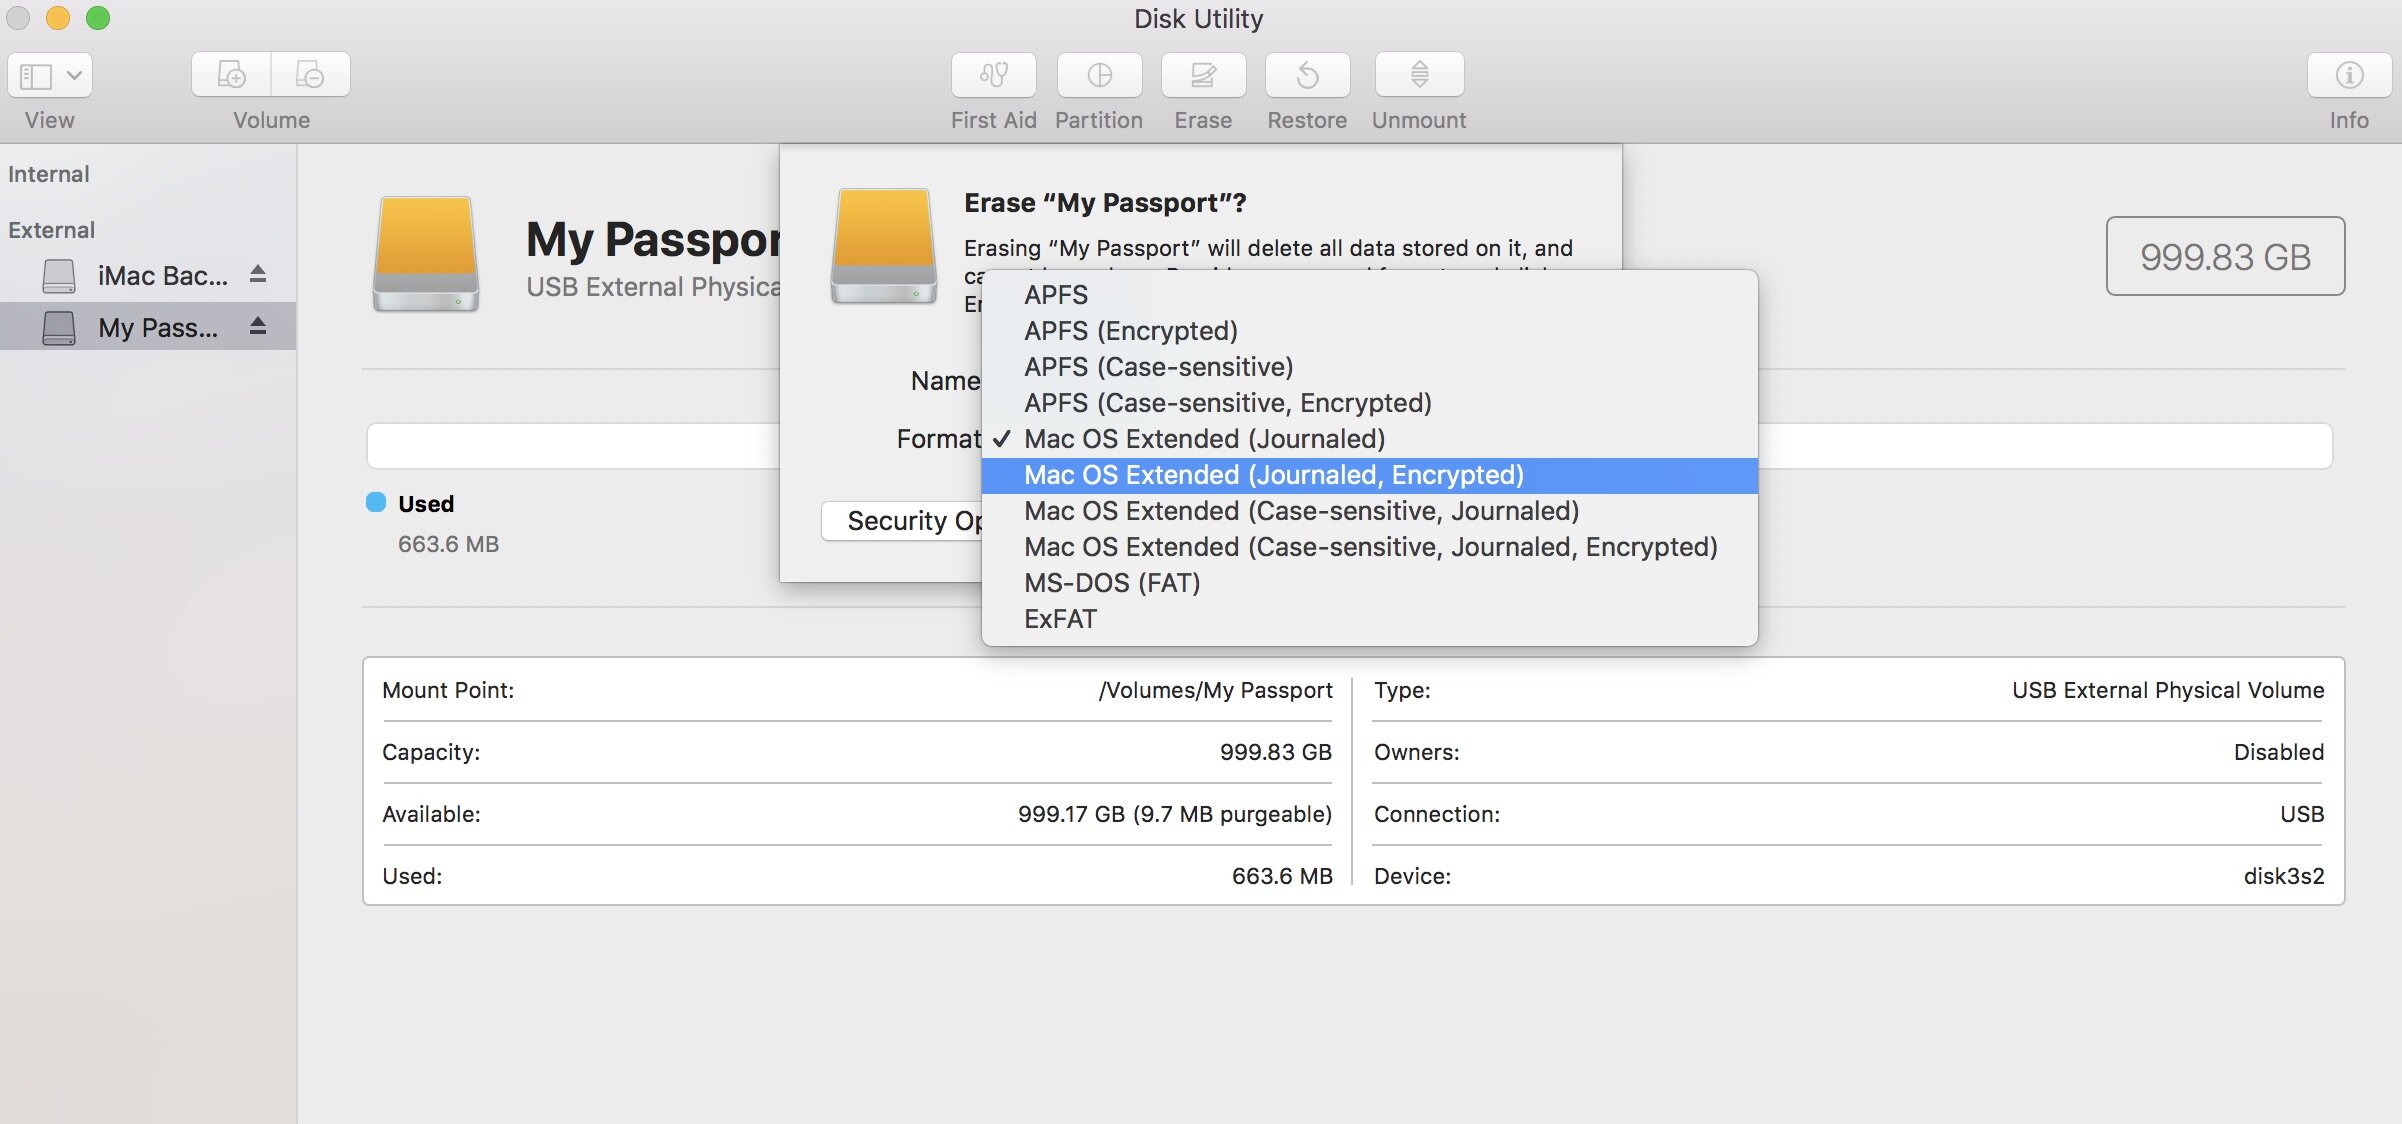
We will choose the Mac OS Extended (Journaled, Encrypted) file system only.
Time Machine cannot back up to an APFS formatted HDD. So, do not choose APFS.
Let's go ahead and start with the formatting.
Before you go through the following steps, make sure that you have selected the right HDD i.e. the one with no data on it, that you wish to format, encrypt and subsequently use for backups. If you perform the following steps on a wrong disk, you will permanently lose your data.
STEP 1:
Select the right HDD (My Passport used as an example in this guide) and click the Erase button shown on the top menu item in the Disk Utility.
STEP 2:
Name the HDD (Monthly Backups - Named as an example for this guide) and select the file system format. Mac OS Extended (Journaled, Encrypted), will be selected as a format, because this is what the Time Machine supports.
STEP 3:
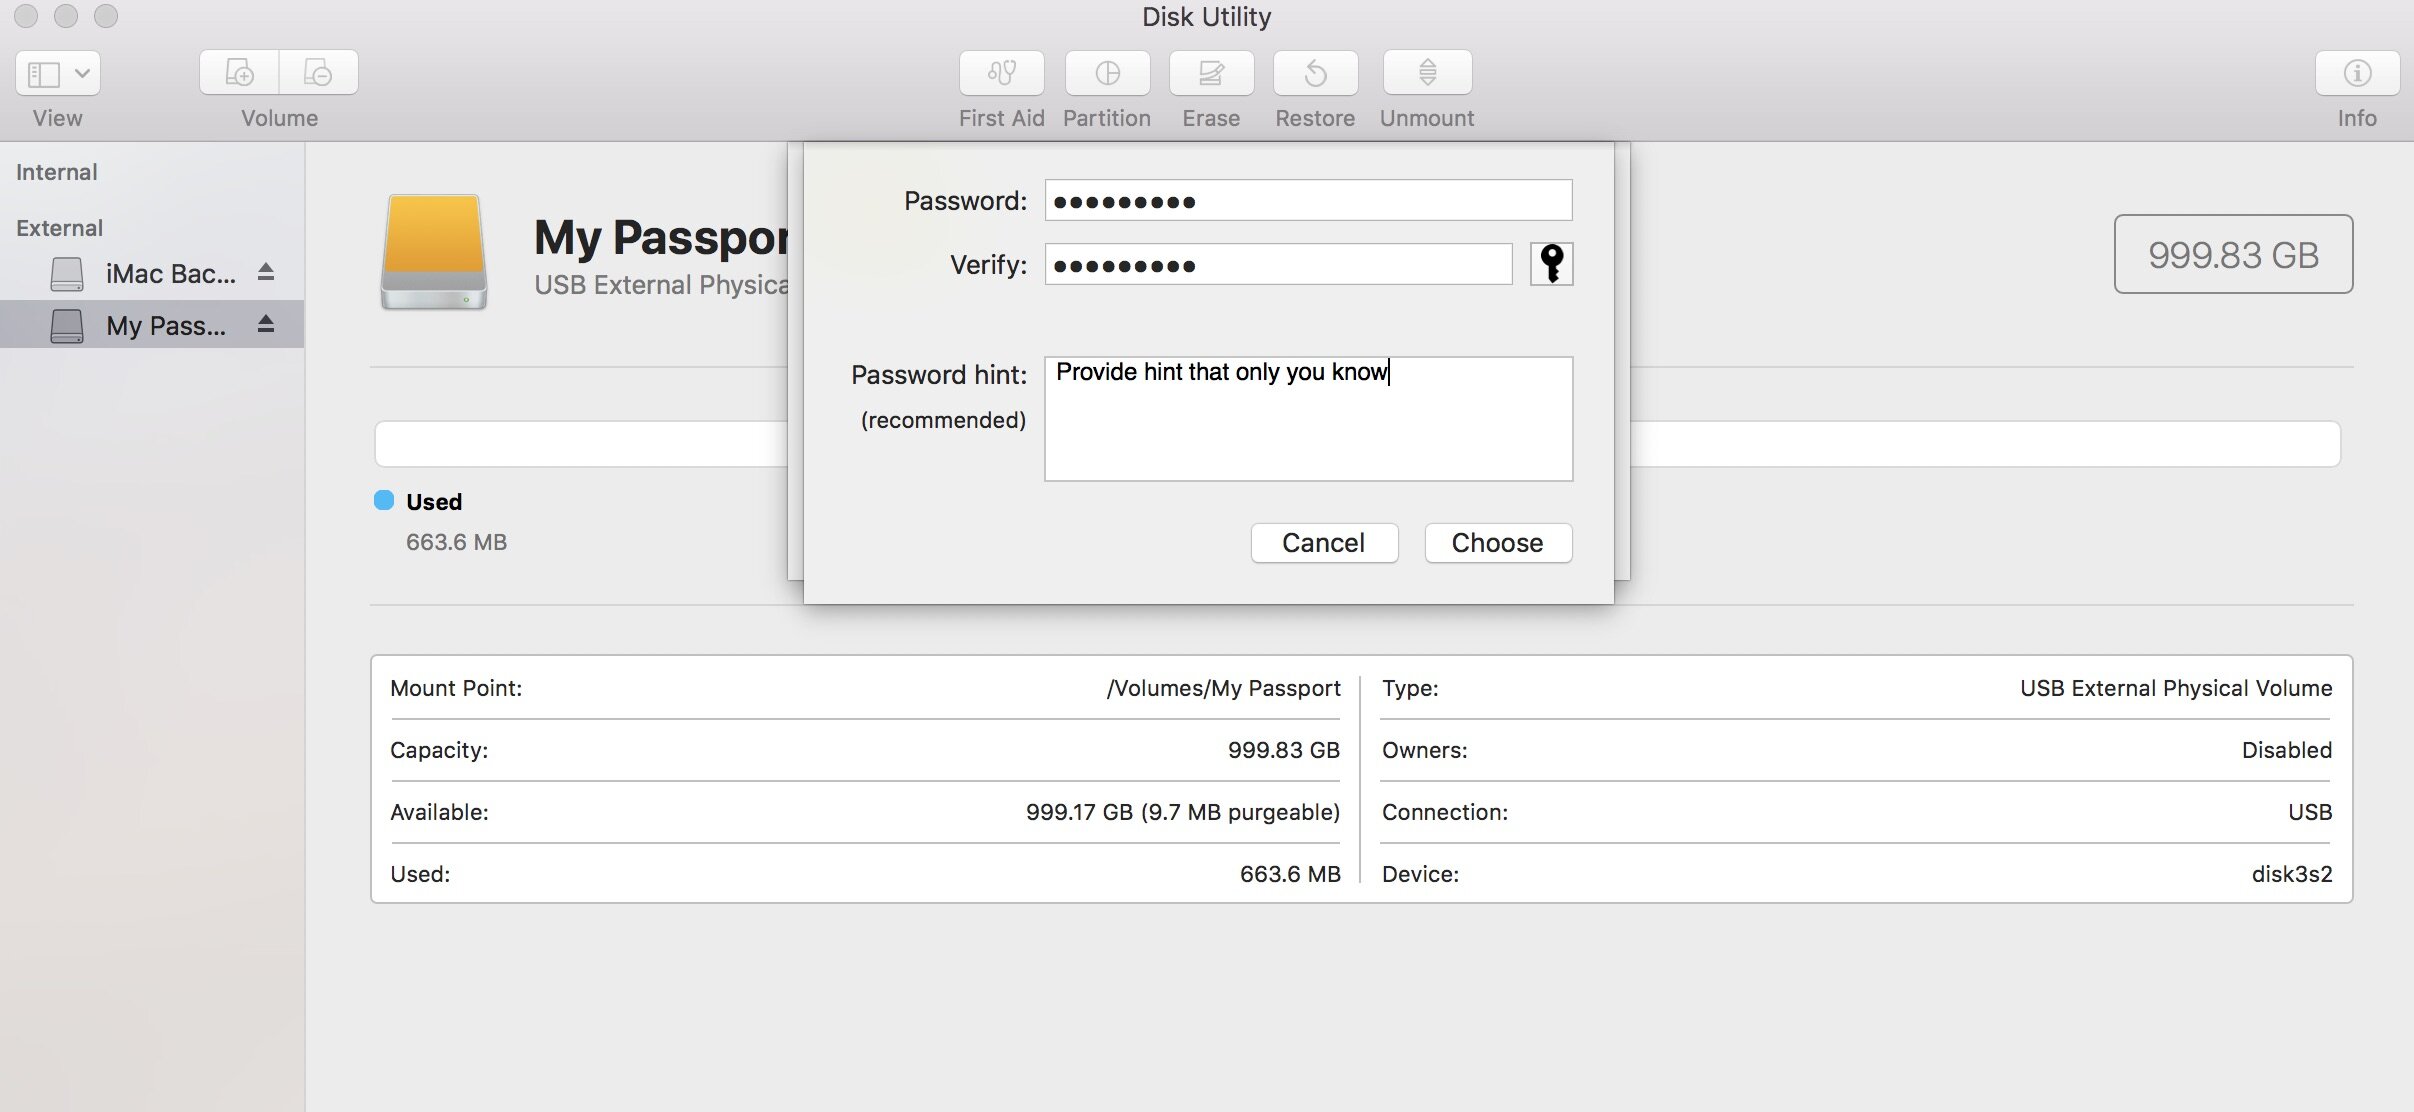
When you select Mac OS Extended (Journaled, Encrypted), you will be prompted for password. Provide a secure password, which will be used for encrypting the HDD.
STEP 4:
After making the selections as above, go ahead and click Erase.
It will take less than a minute and you will see a successful operation message. If for some reason the Disk Utility throws some error, when you do the Erase for the first time, you might notice that the volume name changes from "My Passport" to something similar to disk3s2. If that's the case, just unmount the HDD and mount it back on and go through the Steps 1 to 4 again.
STEP 5:
Test & verify by quitting and relaunching the Disk Utility.
Once the Disk Utility is re-launched, select the Monthly Backups HDD and click unmount. You will notice Monthly Backups will be greyed out. Select Monthly Backups HDD again, and click Mount.
This time you should be prompted for a password. Once the correct password is provided, you will see the HDD gets unlocked and mounted back on.
Verify the file system format shown under the HDD name. It should say Mac OS Extended (Journaled, Encrypted). Your HDD is now encrypted and is ready for storing secure backups.
4: SETTING UP TIME MACHINE
If your HDD is not already connected to a USB port on your mac, then connect it. When you connect the HDD, you might be asked if you want to use this drive for Time Machine backups. If you do not get asked, follow these steps to set Time Machine up for secure backups.
STEP 1:
Go to Apple menu > System Preferences, then click Time Machine.
STEP 2:
Since, you have a newly formatted HDD connected via USB (and mounted in Disk Utility), you should see a Select Disk... option. Click Select Disk...
STEP 3:
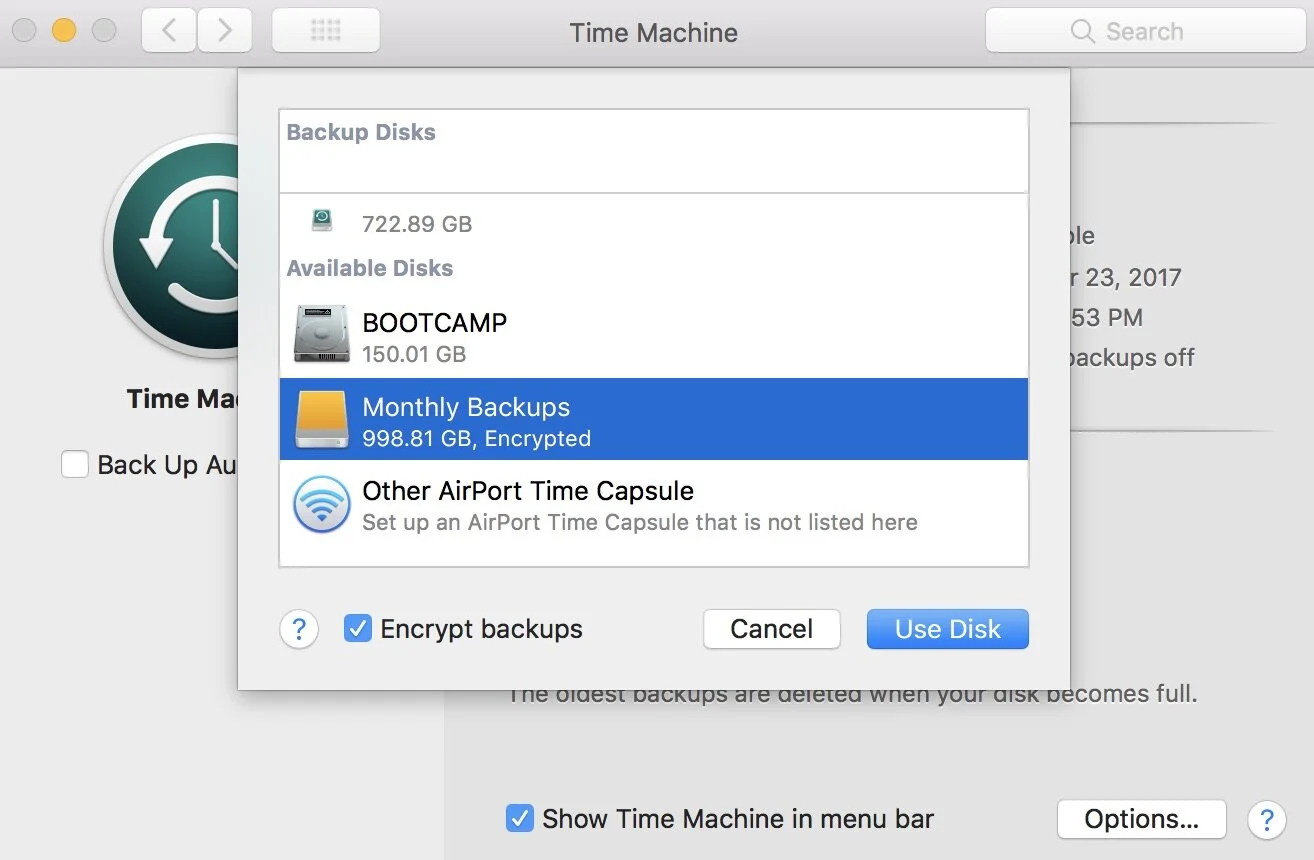
Select the HDD from the list that you formatted and encrypted in the above steps. In this guide, we are using "Monthly Backups", so we will select this HDD. Click Use Disk.
You will notice that the Encrypted backups option is already enabled. This is because, we formatted the HDD in encrypted format in section 3 above.
You will see the icon change to reflect that the HDD is ready for backups.
The default setting for Time Machine is to backup everything on your Mac, that includes all the files, OS configuration and other general configuration settings such as wi-fi settings etc.. To exclude items from your backup, click Options (shown in the above screenshot) -> click + and then browse & choose the items to exclude. Once the items are excluded, they will not be backed up.
5: LET'S DO OUR FIRST ENCRYPTED BACKUP
You can either setup the Time Machine to do automatic backups, or you can do the manual backups. Depending on how much data you have, the first backup may take a long time. Any subsequent backups will be faster.
Ok, so let's back up right away. Go to Time Machine menu in the Top Menu bar and choose backup now.
You will notice that the backup process will start almost immediately. Time Machine will also indicate, how much data it's going to back up and how much time is remaining. Around 200 GB of data may take roughly an hour or so.
Congratulations! I hope you found this guide useful and that you are now fully setup to take secure backups of your valuable data. Thanks.


